Archive for the ‘DIY’ Category

tibetbeads

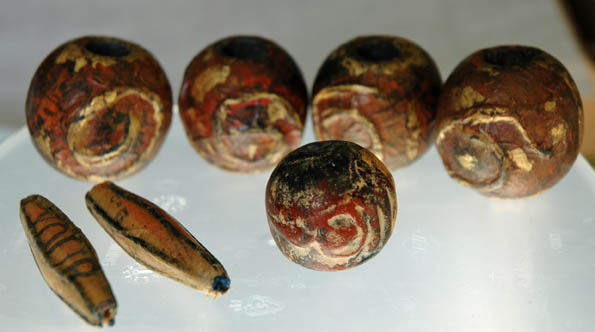
Back in the studio working on my mixed media Tibetan-inspired bead project as it was well along and I didn’t want to lose steam. I got them painted, gilded and sanded, put a couple of glazes on and then sanded again. Finally I sealed them with Matte Medium and applied 4 coats of Renaissance Wax. The bead at center front was my inspiration bead. It is an authentic glazed and gilded terracotta Tibetan prayer bead. I do not know it’s age.  I was not trying to replicate the bead…just want to make some Tibet-inspired jewelry and cannot now afford to buy Tibet beads. The processes involved in making these beads are fiddly, messy and extremely time consuming. The four I finished have at least 20 hours in them.

The two beads in front are completely different. I liked the way the yarn ridges looked with several coats of Mod Podge and dressmaking paper, therefore I did not paint or gild them. They were waxed. Unfortunately, I do not have any more of these odd shaped beads to work with. They remind me of pods and then the words/marks on them adds a quirky kick.


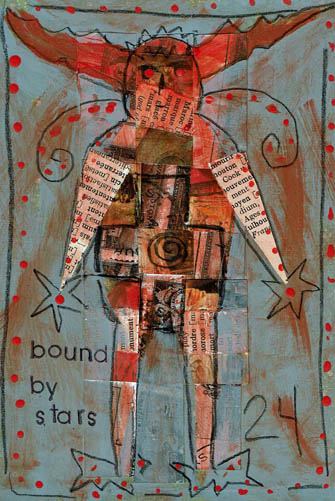
bound by stars

This Daily Art practice took the full hour to make. I barely had time to frame it out and add the acrylic dots and stamp the text.

Most of the time was spent weaving the paper strips. It takes awhile to get them situated and then affixed with matte medium, then dried enough to continue. I bought matte medium today because I ran out of it…I tried to get along with just Mod Podge but some applications don’t work with it. If I don’t want the hard resistant coating on the surface (like here to glaze it with acrylic) I prefer matte medium. If you aren’t aware, matte medium is a glazing medium, sealer and adhesive (lightweight). Mod Podge is a sealer and adhesive (heavyweight). If you want stuff impenetrable and permanent and affixed until the Four Horsemen ride through, Mod Podge is your huckleberry. Anything else use matte medium.

My plan with the piece was to mask the weaving in a shape of some sort.  A mask is a reverse of a stencil; in fact, a mask is the piece you get when you cut a stencil. Not all stencils create great masks, because if the stencil is very detailed you can’t keep all the bitty pieces to use as a mask. A stencil prints over where it is put and a mask prints around the space it is put. Obviously you don’t have to create a mask to do a mask technique…you can freehand letter or draw, around what you want to keep and cover what you don’t want with color.  In this way you can make an expressive drawing with shapes, letters and focal images in a composition. It is a fun way to do stuff, sort of in reverse.

I’ve seen artists put layers of material on a substrate only to cover up most of it with black paint. Seems like a bunch of work gone to waste to me, but the results are spectacular. Also, if you scan the piece before covering it, you can use the work over and over by printing it, thereby making use of the time it took to make it.

Keep in mind that you can use any color as your outline/fill, not just black. Also, depending on what you are outlining, you could use white or a pale color. That could be cool. I haven’t done that yet.

I was going to cut a stencil for this basic figure with the antlers. I would use it and it seemed worth the time to do it; I’d have both a mask and a stencil to use. However, the stencil board I have was under a bunch of heavy paper and I couldn’t get a sheet out. I looked around and saw a greeting card kraft bag (you know, the slender kind) so I cut the figure out with scissors. This was the easiest, fastest way to get the job done. Then, I laid the mask over the weaving and outlined with my favorite Wolff’s Carbon drawing pencil. I selected grey as a background cover because I like grey, but had I not been so hasty, I might have selected navy. It would have been richer with the orange and since I texted “bound by stars” navy would have made sense. Ahhh, another day.

If you are in a hurry or have hand problems or patience problems or are afraid/unable to use an exacto knife, a pre-cut stencil is an inexpensive long-lasting tool (although they are quite pricey for what they are, I mean cheap plastic). Since stencils have become so popular, they are now very detailed laser cut available in diverse design styles. I have stencils that I would not in a million years consider cutting out myself. But, you can make a perfectly wonderful unique stencil yourself in less than an hour. You can use your own drawings, clip art, images from photos, etc. You can scan a photo into a basic photo altering program, many of which feature a “stencil” filter. Print the altered photo and  create a stencil. If your program doesn’t have a “stencil” feature, up the contrast and voila, a usable image. Build a library of favorite symbols, animals, etc. You get the point. Anything that gets more of your own hand into a piece makes it more satisfactory and interesting, IMHO.

Don’t forget to keep the cut out parts of your stencils and put them in a separate envy called “masks”, or file them with the stencil.  Once you start to mask, you will be glad to have them.

lifeisatapestry

Well, guess what? The studio is tossed again.

Last week I put my big folding table into the middle of the living room and brought out the various and sundry boxes and bins of paper and images and sorted it into cool boxes I got at the Dollar Tree. The boxes are letter-sized and have a self-lid and hold a goodly amount of of paper. I was soon overwhelmed with the sorting but I did get through the bins It is so much easier now to keep it neat and find images by subject matter which is important to me. I wanted to do a page with an owl last week. I have 284 pictures of owls around here and couldn’t fine one. One. That’s what started this ball rolling.

I got overwhelmed, particularly with laser copies (lots of black and white) of my own photographs. In the good old days I had a color laser printer and I routinely printed contact sheets and reproduced my photos. Lots and lots of mannequin photos because I used them frequently in my work. I knew there were too many to go into the nifty boxes without there being 30 boxes of mannequin photos. So I started shoveling them into a separate pile. Before I knew it, that pile was teetering on the edge of calamity just like my sanity.

I had to put the big table away, and the stack took up home on the dining table. I filed the neat boxes away in the studio and that was a wonderful feeling. But then I’d walk through the center of the house and the stack that didn’t get filed away, mostly my OWN art, was taunting me. Plus, the dining room is smack in the middle of my feng shui Wealth area and that is not good. How many mannequin photos can your Wealth area overlook? If I know my Wealth area, and I do after many hours of studying it and moaning over it, there were about 6000 more mannequin faces than it could manage. My Wealth area couldn’t even with it and neither could I.

There were stacks of paper. Strangely, I’ve been obsessed with stacks for awhile. It started with caryatids about 18 months ago. They were fascinating to me. Then I saw pictures of cairns that my husband took in the Smokey Mountains last spring. There is an artist that works in several rivers up there making cairns (he’s around on the internet, Google him if you want to see his work. He is really good, a true Rock Whisperer). Then I ran into this cool Edward Gorey’ish fabric during Halloween that was so exciting to me. About that time the Alice in Wonderland stencils showed up at Dollar Tree. One day I couldn’t take it anymore and cut out a caryatid, the gothic fabric and created an Alice stack using illustrations and stencils. A reprieve but I returned to stacks again.

Stacks of paper. Obsession with stacks. What are stacks? They are layers on top of layers. Image on top of image. Strips on strips.

I couldn’t use all those faces, but I could use strips of paper. I could weave them, layer them, draw on them, use them as backgrounds, etc. I could make strips out of all that stuff, throw them into a box and haul a handful out and use them however I want to in the moment. If I found I didn’t like the process, or wasn’t using the strips, I could toss it all into the recycle bin with no guilt.

So yesterday I spent a few happy hours layering paper and cutting it with my paper cutter. All different widths. I find cutting or tearing paper stress relieving. I can honestly say I enjoyed it, and I thought about the strips most of last evening. I had the urge to get up and bring some in to draw on but I didn’t because we were relaxing watching Dexter. It’s one of the few programs I enjoy watching, but I was tempted and that is a good sign. I’m onto something.

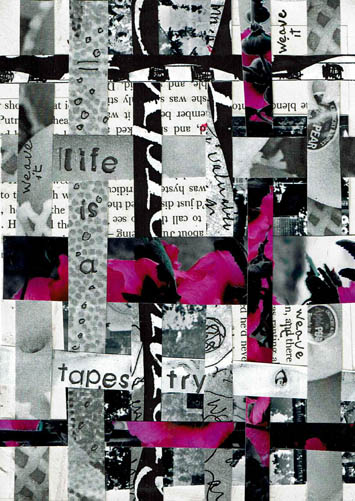
So, my Daily Art practice rolled around and the first thing I did was grab a bunch of strips. I wanted to start by paper weaving. I took two wide strips, cut them into random pieces. One was a black and white photo of mine, the other text from a book. I glued those pieces randomly to a paper foundation. Then I selected several strips and cut them down to smaller widths. Surprisingly, all the strips I used are my own work. I did simple over/under weaving over top of the other images, shifting the colored strips to where I wanted them. I glued the ends down to make it permanent.

The process created leftovers and I tossed those strips back in the box to be used for another project. I decided to journal, and stamped out “life is a tapestry.” Then I wrote “weave it” in black pen randomly, and did some circles on the strip with the wording, to make it stand out more. This project was finished in an hour and I very much enjoyed it. I plan to do many of my Daily Practice pieces with these strips this month. Perhaps it will inspire you to try it.

I will soon post an update on my Mythos blog about how my 2016 Initiatives are going so far. If you have an interest check it out over the next few days. I will say here that I missed only 1 day in January. The day I missed I simply did not want to be in the studio. I was tired and not feeling particularly well. To go in would have defeated the purpose of the Initiative, which is to give myself time to do what I love. It’s not an obligation, it is a privilege.

I would urge you to get into your studio every day, even if just to paint a background or stamp a word on paper, or whatever you enjoy doing. Just for the fun of it.


styro1-13-16

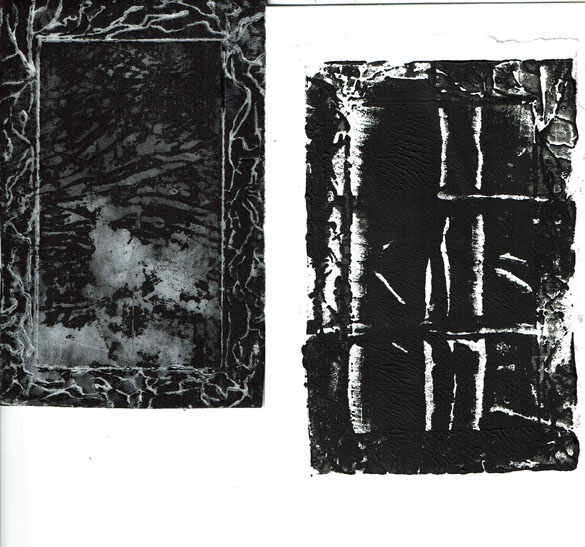
The carved styrofoam plate on left, my selected print on the right.

My Here’s my Daily Art practice for today. As one of my legions of fans, you are well  acquainted with my love of styrofoam printing, even though it is certainly among my top two on the list of Unpredictable Techniques I practice. Ink blotting is the first, if you are interested and I know you are. A pattern appears to be presenting itself; I am thrilled with the surprise and frustration of uncertainty. The surprise rather more than the uncertainty, but one has to take the chalk with the cheese.

So, I return to styrofoam printing after a long absence. And, of course, I’ve forgotten everything I knew about it. Seriously. Besides which, there has been one most Unfortunate Incident–I developed an allergy to, or at least a big physical aversion to tempera paint. This was a blow to me. I had developed quite a passion for, love of, and dependence on tempera paint for numerous techniques. I used it instead of gesso. I used it to do expressive finger painting. I used it to create paint blots (those were gorgeous). I used it to print styrofoam plates. It is quick drying, one of the most reasonably priced art materials and widely available.

After investing a goodly sum on tempera paints for a venture different from standard art making (preparing papers for my Interactive Intuitive Readings), and using them for about six months, I happened to leave town for a couple weeks and came back to my studio to notice a nauseating smell. And suddenly I had headaches and sinus problems. Bob did not smell the smell. Even the papers I had previously prepared became unusable. When opening the bottles I was literally assaulted by the stench and this was heartbreaking. I did some online research and there was a small mention of tempera turning moldy and developing odor, but I opened bottles and poured and I couldn’t see anything at all.

Not only had I spent money on the paint I couldn’t use, I had to scramble to find a media to replace it. That took a lot of effort and ended up costing me another goodly sum for Dr.Ph.Martins® Bombay India inks–which are beautiful and Dr. Martin has been making them since 1934, apparently with liquid gold if the price is any indication of the ingredients. But I digress.

I was thrown back into using gesso or acrylic paint for backgrounds. I stopped doing finger painting; I just don’t enjoy it with acrylic paint. Plus it is shiny and one thing I loved about tempera is its matte finish. (There is a good bit of raving about the wonders of tempera elsewhere on this blog.)

So, I took a break from styrofoam printing, except for a fling using ink pads. I either decided dye pads or pigment pads were the best and I can’t remember which it was. That’s a problem because mostly all ink pads are either dye or pigment ink. This is one problem with advancing age or being an artist. Or maybe both. I don’t make notes, or I do make notes and samples and then can’t find them.

Beginning ANEW today, and working with what I have, I cut a styrofoam plate to a good size to print on my 5×7 paper. I brought a stack of that Allstate found paper I spoke about recently to use as scrap practice printings. First, I used a pigment ink pad and that didn’t work one little bit. Feeling encouraged, I used a dye ink pad and that didn’t work either. Feeling desperate, I reached for my Staz-on® ink pad and, of course, that worked best, but not good enough. Just a note, there really isn’t any reason to have any ink pads except Staz-on®.

I next put a blob of black gesso on a piece of wax paper and spread it with a credit card. This is the same technique I used with tempera, back in the Good Old Days. I put the plate on and applied moderate pressure. The print was without definition. I took some paint off the wax paper and pressed the stamp again. Still too much paint. Took almost all the paint off and came up with the print I settled on. At some point I also scraped paint directly on the styrofoam, but that didn’t work, too much paint. Each time between experiment prints I had to wash the paint off the stamp. Luckily, this is quick and easy with styrofoam. Just blot the water off and have another run at it.

Luckily, I was truly happy with the print I got. Clock is ticking friends. I had just enough time to heat gun it dry, wipe the back with gel medium and mount it on my Rives BFK® printmaking paper. This print looks to me like a dark night, a window through which we are seeing the ghostly outline of a tree. Perhaps you see it differently and that is ok by me. Also, I show you the plate.  The plates can be used as elements on their own.

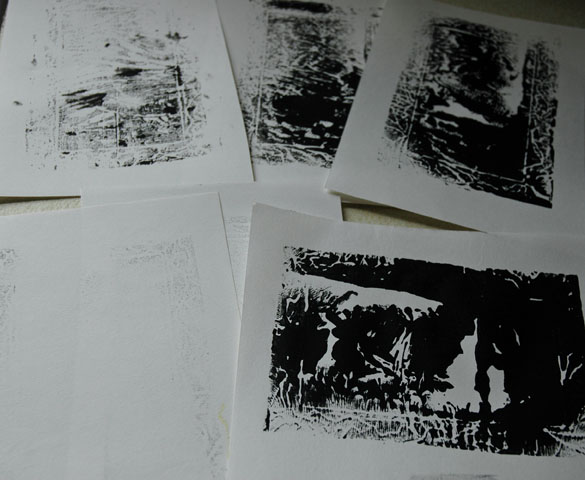
Here’s a picture of the “waste” prints. They are going into my journal. The print shown in landscape orientation has shapes that I will probably work back into to make a separate Daily Art. printpractices

Nothing goes to waste playing with styrofoam printing. If you have a a junk book to alter print into that for instant backgrounds. If you have junk mail or envies print on them. Sometimes an unsuccessful print is amazing. Actually, the print I loved has no relationship back to the plate. I was trying for the decorative border, not the interior of the plate.

Here’s the thing about styrofoam. It is slick as owl shit. Paint doesn’t really want to stick to it. I am facing the ugly fact that I am going to be pressured into pulling out a glass surface, a brayer and some printmaking ink and give that a go. I do not want to do this, that is why I have never done it. It’s too darn much effort and too darn much clean up. It just takes all the fun out of it and who knows if it will work, anyway?

P.S. After I boxed up some of my tempera papers and they sat for a while, Bob opened the box and nearly lost his lunch. Vindicated, but I still miss my dear ole temperas.


barebear

Here is my creation today. It is expressive art mixed media that began with this image:

b4croppedweb

How did this image come to be? About six months ago I bought some stencils at the Dollar Tree. There were five sets available: Sea Life, Farm Life, Alice in Wonderland, Monsters and an alphabet. (I wrote about these at Mythos in an entry Idea Farm). I bought the Alice set and opened it about a week later and it was awesome. Yes, the stencils are on lightweight cardboard, but they were detailed and cut cleanly. The images they selected were not all mainstream. On my next trip in I decided to pick up each set.

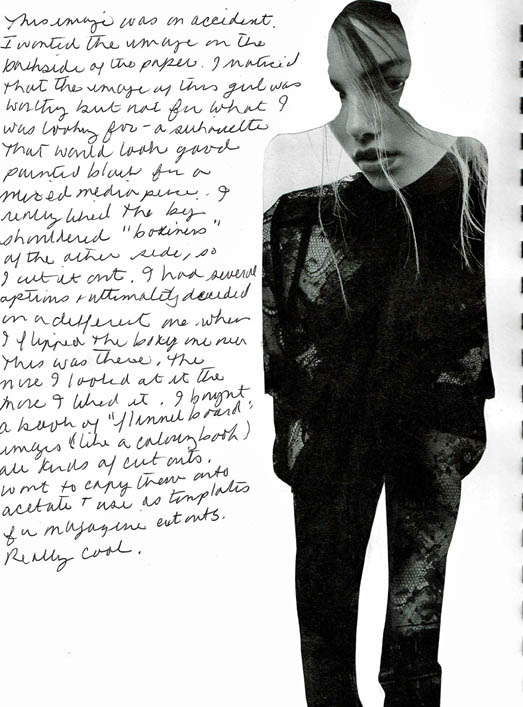
For some reason, perhaps all the children’s books I’ve been looking at, the Monster set got appealing. Actually, it started further back than that now that I’m thinking about it. About a month ago I decided to do a mixed media piece using a black silhouette. I’ve done these before (some of them are shown on this blog). Basically, I find an evocative fashion magazine image, one that will translate to being blacked out. I cut it out, paint it with black gesso and create a background to put it on. It’s fun to do and cool to look at. In this instance, I found a couple good samples. I flipped them to the back, and one of them had an image I had not planned. I decided on a different image for the piece I was working on, but I wanted to remember to try this, although as I say, it was an accident. I was going for the boxy pose on the other side. I put the image in my process journal and made notes about why/how it had happened. I left my notes on there but not sure you can make them out.

accidentalcutoutweb

I think this was backburnering, then the children’s book thing happened. The Dollar Tree stencil sets are a good size for my 5×7 Daily Art Initiative projects. During TV time, I go through books and magazine pages and hold the stencils over the pages to find ones that utilize the images on the page.

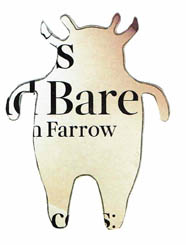
Because the Monsters (I prefer Creatures, because, really, they are more cute than scary) were abstract I started with that set. Oh, the fun that I had. I tried to use all the Creatures, but found I was partial to several. This one seemed “bearish” to me, it also reminded me of a shaman cave drawing. When I saw the word “Bare” printed on a page I couldn’t resist myself.

All the little guys and gals got gelled down to a full size piece of paper, smack dab in the middle. I’m not sure this was necessary but it seemed like it was, so that’s what I did. The idea was to scan them, crop them and then be able to stick them all on a page(s) to print out to conserve paper. Seems counter-intuitive, doesn’t it? I do not want to use the originals.

I have about 30 0r so done. See my last post about how fast my new Brother inkjet scans. I sat down the other day and scanned them all, then I sat down yesterday and cropped them all and grouped them in files so I could do what I did today, quickly and efficiently. It was a lot of work to digitally resize them and organize them, but if I don’t do it right away, they will just get lost and not get used. Another important Initiative in 2016 is to develop the habit of Organization, but I digress.

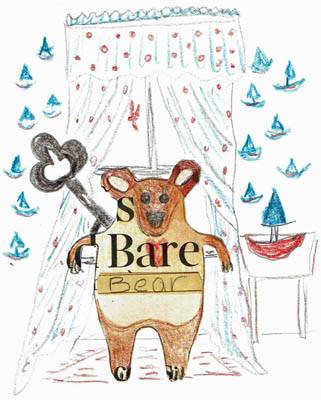
I wanted to use Bear, so I picked this one because of the Bare fun factor. I am easily amused. As you can plainly see, the image RESEMBLES a bear, if you squint and tie your Imagination Hat firmly onto your Noggin. Colored pencils are a dry medium so I used my Prismacolor set. I adjusted his ears and they were way too big, which sure set the tone right off the bat. Then I drew the face. I swear to God, the first face made him look like a rat. I couldn’t even with it, so I erased and started again, making the face bigger and wider, and that got better. I messed about giving him paws and shading him in. But there was that awful “Farrow” word that had to go. What to do? I thought the best thing would be to cover it up with a dry, opaque something and decided on ledger paper. I wanted to write the word “Bear” out because I thought maybe the drawing wasn’t good enough to allow you to get the joke. And the paper was all lined like elementary school, so I wrote “Bear” in a childish sort of way.

About now, I have an ugly bear with a childish look and goofy word and a pretty elementary pun to boot. Then I read it. “Bare Bear.” It sounds like what a kid would name a favorite, cherished stuffed bear. This is no longer a bear, its a bear TOY. But it was standing up so tall, not like a stuffed bear. Then I thought, it’s a wind-up toy bear that walks. But how to show the winder thingy? They are called keys, and this is an old school toy, so I can just draw a key winder. I made it big to make sure you could see it and know it was a toy bear.

Man, I only had an hour and I was running out of time. That rat face put me way behind. This toy bear made no sense at all standing in the middle of space, he needed a room. A kid’s room. A boy kid’s room. So I drew some curtains and put on some sailboat wall paper and an out- of-perspective table with a sailboat set on it. I polka-dotted the curtains and was just putting the red fringed rug under Bare Bear when the timer went off.

Ok, we all know this is no Beatrix Potter but I don’t give no fiddely dee about that. I like this; I like everything about this. I especially like these things: I enjoy doing this during TV time because I don’t enjoy TV much; this is super cheap–.10 magazine, $1 for 20 or so stencil images; the process spurs on imagination; drawing practice. Mostly I like this cute little bear waiting for a little boy to wind him up and give him some animation. Good ‘ole Bare Bear, long may he bust a move.

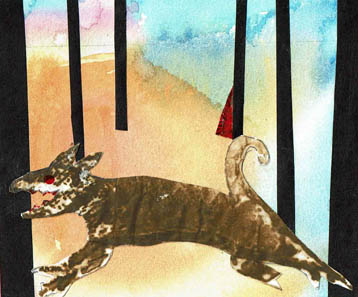
dailywolfracesredweb

My Daily Art Initiative is detailed here. This post is to discuss the process of making the above pictured piece.

This image was made in one hour on a 5×7 sheet of damp Rives BFK printmaking paper. The background is Pelikan’s gouache paint. I used colors intuitively and when I was finished painting I held a small fan close to the paper to dry it. (Obviously the fan is completely enclosed in a heavy wire cage for safety).  It took longer to dry than I thought it would. Remember, I’m on a one hour clock.

If you’ve read previous posts you know I have been experimenting with walnut ink and ink crystals. I use a waxed paper sheet (like deli paper only more see through) underneath any inking projects; walnut ink stains everything. I keep the paper because, well, you know. Because it’s paper and it has walnut ink on it.

A cat, let’s say, Peter Pan, knocked one such walnut ink paper off my desktop. I can’t swear in a court of law that it was Peter Pan, but I have a strong feeling it was. In this case, and likely ONLY in this case, I should thank him for it, because as I was bending to pick the paper off the floor (in order to prevent a vaudeville-like slip resulting in a worker’s comp case AGAINST MYSELF) I distinctly saw a running wolf with it’s mouth open showing his teeth. It was the head and mouth that was the easiest for me to see…although the tail and back leg were also prominent. It was just the proper size for a 5×7. I copied it on my Brother All-In-One inkjet printer. I am going to pause here to discuss this printer.

After some discussion and research Bob and I decided to get the Brother Work Smart series model MFC-J885DW inkjet printer not too long ago. I have not had an inkjet printer for quite some time. Previously I had a Canon inkjet which printed very nicely when it would print. Which considering the print head failed after 10 hours of printing wasn’t very often. I was given the first one, and it printed nicely and so when the print head failed I figured it might have been used a lot before I was given it. Just a note: if your print head fails, it costs 2x as much to replace it as it does to get a new printer. So I bought a new Canon, and that print head failed as well, unfortunately after it couldn’t be returned. I gave up on inkjets after that. We all know why, but for the five of you out there that might not, I’ll go ahead and say why. It’s because that you can purchase an inkjet printer for $19.95 and it will print very nicely, and the print head might last longer than 10 hours, in which case you are grateful. But then the fun begins. Long about 10 copies in, the dinky starter cartridges of ink that came with the printer are all drained, then you have to replace them with full size cartridges, sometimes each color separately, but at LEAST two cartridges, one black and another tri-colored. Actually, it is better if the three colors ARE separate because at least then one doesn’t have to replace a tri-colored cartridge just because you got all into yellow for awhile and now there is no yellow left, just the other two colors that have to be tossed like the proverbial baby with the bathwater. Whether you have the tri-color refill or the individual refills hardly matters, because all of them are going to require a second mortgage to replace. You see, it’s the bait and switch deal. They pull you in with a cheap printer that’s head will fail right after the time you buy the refill inks.

So, we’ve struggled along with our most excellent laser all-in-one. Laser printing is most economical but, alas, just black and white copies. Actually, it is most economical but the toner cartridge, which will last well into the next Presidency, costs $80. Sigh.

It started to seem as if I wanted color copies. I considered scanning and sending to an office supply store; color copies have gotten less expensive than they used to be ($1). However, to do this I would have to scan each item. Meaning, if I had an inkjet all-in-one I could just photocopy which is more efficient. The Brother had great reviews and the ink tests and prices were decent. And it was a great decision because I seriously love this machine, for a bunch of reasons that I didn’t even anticipate. It is fast copying and printing. All good. It is wireless and it works. Very nice. It has a touchscreen that runs it. Wow. I don’t even need a computer on to use it. It saves right to a stick drive. I control everything it does on that touchscreen. And the scanning, oh the scanning. Perhaps it doesn’t have truly professional scanning options but who the hell cares? I can scan in about 15 seconds, with no computer. I. Can. Scan. In. 15. Seconds. And, because it’s Bluetooth wireless, I can go in the other room, use that computer, use Adobe and send it to the Brother.

In short, I am in Brother All-In-One Worksmart heaven. This could be the single, most revolutionary thing to hit my studio in a long time (besides me being in there). I am not kidding.

So back to the art. Blots on paper are odd. When you use the copy machine, sometimes the blots look different than IRL. Maybe it’s the difference in the paper texture, I don’t really know. I copied the blot but it didn’t clear up the image, it was almost the same. I did use the inkjet copy to trace the image of the wolf as I saw it and decided to use that tracing as my cut out. Remember, I’m on a one hour clock. If I wasn’t on the clock I might have taken the time to redraw on the original blot, but I didn’t have the time.

The wolf needed a context. With Little Red Riding Hood uppermost in my mind these days, he was placed in the woods. Just black paper strip trees. I found a tiny piece of red paper and I colored over it with a red Copic marker. I tried for some perspective by varying the depth of field of the trees. I finished with one minute to spare.

This piece could use more detail work. I might put some grass and stones under the wolf to get him further into the foreground. I would have to do something with where Red is. The watercolor background is not very suited to the woods, it is way too bright. Red actually looks like she’s standing on the edge of an orange cliff, not picking flowers for Grandma. One more step to the right and the least of Red’s  problems is that wolf. Yes, in it’s current state, all told, it is woefully inadequate. But it does have that urgency, not withstanding it’s flaws. And it got made, all by me, in one hour.

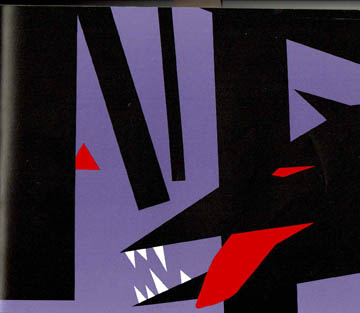
Ok, how did I get this image. Besides the inkjet and paper, I mean. A big part of the how is obviously the obsession and research into LRRH. Pursuing a search of LRRH in my local library’s catalog, I found a book called Picture This, Perception and Composition, by Molly Bang. I had no real grasp of what this book was about, but I requested it. Turns out, Ms. Bang had done some research of her own, into shapes and colors. I am talking extremely abstract shapes. Normally this wouldn’t interest me much, except that she used LRRH as an example of how to build a narrative illustration using ONLY simple shapes and minimal color.

Step by step, shape by shape and piece by piece she takes us through building an image. If the triangle leans in, it feels this way. If it’s smaller, it feels this way. What will make the wolf scarier? How can we put Red into more danger? She ends up using white teeth, mauve background, black trees and wolf shape. Red triangle for Red and red in the wolf’s eyes and a big lolling red tongue. OMG people. In a million years I would not have put this together, EVEN THOUGH, I’ve studied color and universal shape meanings for 30+ years. This is a book that demands re-visiting, re-reading and direct application over a period of time and many experiments.
BangLRRH

This photo copyright 1991 by Molly Bang, from the book “Picture This, Perception and Composition.

It is obvious that this author knows her subject. She has personal knowledge and has used the technique with students of all ages. The book is simple because she made it that way. The concepts are complex, her presentation is digestible. Look at what I did, after just exposure to her concepts. I simply do not believe I could have rendered this work before. I urge you to give yourself the gift of this book if you are interested in the emotional, psychological and perceptional aspects of shapes and colors.

Astonishingly, this book is available used on Amazon for .01 plus shipping. You know where I’m going.

Afterword: I receive no compensation from Brother, nor am I an affiliate for Amazon. Molly Bang is a prolific illustrator of children’s books. The illustration from the book Picture This is used as an example for education and review only.
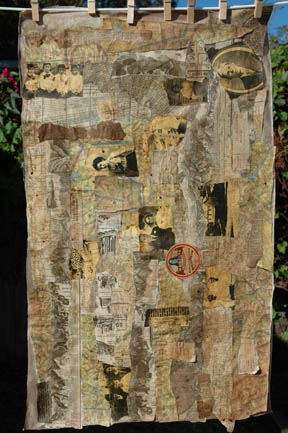
fabric paper step 1

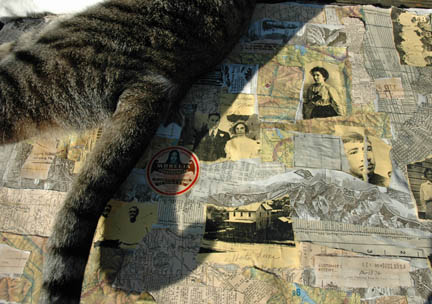
I will apologize first off for the blown out image. I hate shooting in the sun but today there was no alternative. Also, the cat would not move and he weighs about 45#.

Fabric paper offers a lot of opportunities, and I have exploited them often and with great enjoyment. Any fabric will work and I have variously used vintage linen and new fabric. Keep in mind you can cover the fabric up as much as you want with the paper. If you use a print or solid that you want to show, leave gaps between and/or around the images.

After you decide on your fabric the next step is to decide on your images. I find that working with too-thick images doesn’t work, i.e. postcards. They are too thick and too inflexible, but go ahead and experiment if you want to use them. They would be cool but I find the thickness frustrating.

Let’s also say this now: My intention at this stage is not to make a masterpiece. This is the foundation of my ultimate use for the fabric. My mode is to look for texture now, or interest in a background sort of way. Later it will be embellished with whatever you decide, thread, more detailed images, sewing, beads.

I use Mod Podge™. I’ve said this before on this blog. It is an inexpensive alternative medium, thick, with good body when dry and it does the job. I pour the Podge™ out on the fabric, squeegee it around with a credit card and quickly apply the papers. It’s a good idea not to work with too much real estate at one time. Podge™ dries fast, but don’t worry, put on more if  you need to.

Concentrate primarily on getting the papers stuck in place. There isn’t a need to go over them with Podge™, but if you get some on top, just swipe it with the credit card. The reason you don’t want a bunch of Podge™ on the top is because it will make your Fabric Paper more sealed and plastic-y. If you want it this way, go for it. But any ink, paint or dye you want to put on later is not going to get absorbed well. Actually thinking now about it, if you want a streak or texture you can exploit the “resist” aspect by deliberately creating marks with Podge™ that the liquid color won’t cover. That would be fun.

Get all your paper glued down. If there are ends or edges that aren’t glued well, get some Podge™ on there and smooth them down, especially if you are not going to sew at all. Sewing helps get everything put down that you might leave unglued. I like to have some edges not stuck but this could bother you. If you are going to sew on top and you aren’t sure, do some looser to see later how it works for you. Remember, it’s just fabric and stuff you’ve got around the place giving you allergies.

There will be wrinkle-age. Deal with it! Some of them will flatten as they dry but some of them won’t. That’s the way the cornbread crumbles.

The humidity, thickness of fabric, amount of Podge™ you used and the phase of the moon will determine how long it will take to dry. It has to dry through all the layers, so don’t push it. Better safe than sorry. You do NOT want to run damp Podge™ fabric through your sewing machine. I can’t EVEN tell you what that mess would be. Learn patience.

After your fabric is dry, decide if you want a unifier besides sewing. By unifier, I mean a layer of paint, ink or dye. I am currently experimenting with walnut ink that I make from crystals. I love this stuff (you can find it and other wonderful things at animadesigns) and get a real kick out of throwing everything in there to see if it will work. (See another example here). More about those experiments at a later time. For now, I made a strong brew, about 1/2 tsp in a salsa container. I ate the salsa first. I used a large paintbrush to apply the ink. It beads up on any spot that has heavy Podge™. It will also puddle in low spots and I like this. I try to get a coat on every part and especially between the images and around the edges of the fabric. After Coat 1 is dry, apply Coat 2, really getting into any areas you want darker. I want it unified, but not all the same tone.

Now, if you use acrylic paint instead as your unifer, work in a small area, paint over top of the images and wipe down quickly. Use the same heavy/light application technique, but layer and go slow. It’s easier to add more, impossible to get rid of unless you sand and there goes your paper. With acrylic paint you can also add an acrylic medium to make more of a glaze and longer working time, that’s more like inking. Remember, acrylic is plastic. It’s a permanent coat.Fabric Paper step 2

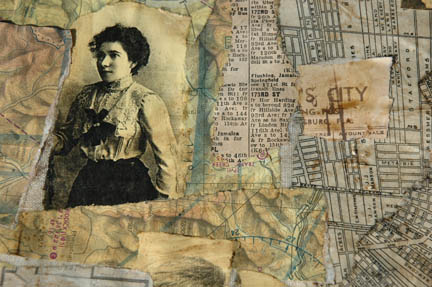
Walnut ink is a subtle dye. Also, it is a purplish brown dye, keep that in mind. It looks murky in the container and when it goes on, but it dries light. I trust you can see in this picture how the papers seem more one tone, how the muslin is toned, and a few paper edges are really dark.

I decided that I wanted two coats for now. It got hung on the washing line to dry. In the Florida sun it was probably dry by the time I got the last clothespin on, but I wanted to write this up so it’s still out there.

It’s coming along nicely. In Part 2 I’ll tell you what I’m using it for and we’ll see what I decide to do before I sew it on the machine. I know you are busting with anticipation. Get a grip on yourself!

Fabric Paper Washing Line

Great things happen when listening to Jane Siberry’s “When I Was a Boy”.

organization notebooksI’ve been spending some time looking at videos of artists and how they work, the clues they give off about their organization, product preferences, etc. I’m not so much concerned about whether I like the artist’s style or the products they do use, but perhaps their reasons for what they do or what works best for them. There is a lot that can be gleaned from this, even if I look across medias.

One thing I’ve learned about myself is that action carries change. If I do not take action, or I do not have an orientation to accomplish some type of change, it just won’t happen for me. So while it has been informative to watch videos and learn, unless I put some concrete steps in the development of new habits, it’s just a waste of time ultimately, or at least a pleasurable activity that could be more satisfying spent elsewhere. Like on my own art or education or recovery.

But there are certain artists that interest me enough to keep watching. The artists that intrigue me are those that have done, as a practice, only the work they find satisfying. They are the artists that fill their own well by doing and experimenting. These are the artists that would (or do) work for the pleasure of it and would likely do the same stuff if they didn’t get paid. Most of them are getting paid, but I can tell pretty quickly which are participating in art as a lifestyle and which are earning a living.

Don’t get me wrong. There is absolutely nothing wrong about making money as an artist on artistic work. But I am more interested, as a matter of study, in those artists that simply mind their own business and do what they want, as a practice.  They teach for the fun of it, because they want to. They publish because they have something to say, even if there is hardly anyone reading. They self-publish for experimentation or to refine ideas. They make art for themselves and the world catches up with them.

There may be ambition, or planning, or networking at work. I’m not suggesting that successful artists go willy-nilly along the path. If a book is in the offing, they consider whether they want to write a book now. If a gallery showing is offered, they consider if it is something they want to do. Perhaps it is not a good time to pursue such activities. The work is not a means to an end.

Anyway, as I said in yesterday’s post I am a member of Teesha Moore’s Artstronauts Club™. This is a forum that Teesha wanted to explore and considered for some time before pursuing it. (I am quoting Teesha from her own writing and videos). I’ve admired Teesha and supported her various publications for more than a decade, starting with her Studio zine, Play zine, stamps, etc. Her style is very much her own and she’s evolved it over the years, sought compatible materials, hand-makes her own journals, etc. She develops her own ideas, her own projects and she just keeps doing what she wants. She takes risks. (This is my observation). She’s fine with making money, but she’s also generous in truly sharing how she does what she does. Her Club is reasonably priced and there is good value in membership. And no, I am not in any way affiliated with her. I am a customer and while she published me in the Studio zine years ago, it is not likely she remembers me and I have nothing to gain by speaking of her.

I began to think how I could record and organize these observations of successful artists, so that I could assess whether a habit is worth adopting. Is it compatible with my way of working? Will it improve my life or evolve my art? I took one of Teesha’s routine practices: she constantly recycles her art. She does so by making scans and color copies of her art journal pages and cuts them up, incorporating them in a new design. It is one part of her process, not the entire process.

I got three mini composition notebooks from my inventory. One book is dedicated to my Observations. I approach them “scientifically” and list them in detail. Today’s focus was on the above, recycling finished art, or partially finished art, to be used in future projects in any way possible. I have already done work with my own photos, and I have already created original journal pages and canvases. I almost never take the next step to reproduce these works and use them again in some manner. For years I’ve thought about this, wanted to do this, but I haven’t. Watching Teesha do it on videos keeps bringing it into my awareness. I’m ready to take action.

The second book is for Action steps. To-do lists, broken down activity by activity.  Education needed, skills to develop, setting priorities. This is the how-to part of the habit. It’s not just going to happen and become a habit. There is always room for refinement, but I am building a foundation here, not a house.

The last (or next?) book is the Acquire aspect. How or where do I get the education? skills? experience? What about materials and tools? How or where do I get them? What resources will it take? I have a set of re-minders on the cover as to various means of acquisition.

If you’ve looked closely at the mini books, you will see the pattern and printing through the label. These are workbooks and I don’t care about that kind of stuff. Also, I picked the mini comp books because they can be held together with a rubber band and taken in my purse. While I am waiting at the doctor’s office I can review my progress or make new notes. It’s a matter of convenience and utility with me, not making a masterpiece.

Which brings me to today’s experience. I wanted to reinforce the composition book bindings. I like the black tape and wanted to put another layer of black masking tape on. I was sure I had a roll of black masking tape, and I was just at the store buying colored masking tape and I know they didn’t have any black, and it’s been wicked hard to find the colored. I’ve just done a total studio reorganization and if it’s not in the “adhesives” bins I don’t have it. Guess what? I don’t have any. I was going to put it on my “to buy” list but that didn’t help me this morning. I wondered, where will I find it? Then I remembered the last time I saw some at Michael’s™ it was in the drafting section and it was about $9.99 a roll. I don’t want to pay that. I looked at my Acquire list. I had already tried to Shop at Home. Borrow: nobody here in the hood would likely have black masking tape and I’d rather not go door to door. Ditto with Trade. Then I hit Make From Scratch.  I had watched a video about making your own custom washi tape, which included both painting and stamping plain masking tape. So I pulled out a roll of blank masking tape and a bottle of black gesso and I placed the piece of tape on waste backing from Contact Paper™ I had used (it’s a paper that nothing sticks to, similar to a Teflon™ pad but way free). Gesso’d it, let it dry, cut it and applied it, not even five minutes of effort.

Result: 1) I didn’t spend too much money on a roll of black tape; 2) I wished I had remembered all this before I paid almost $5 a roll for the neons I found last week (although I am a masking tape fiend and it is something I use over and over, but still); 3) no time and gas trying to find it in a store; 4) able to finish project immediately. A side note: Sam’s Club™ sells 6 rolls or so of regular masking tape for about $12. That’s a lot of masking tape. Make your own washi tape, you already have stamps and paint and ink pads. Have you priced washi tape? Half of it doesn’t even stick properly and the designs aren’t to my liking (unless they are even more expensive Japanese designs). Keep pieces of masking tape on freezer paper handy. Next time you have leftover acrylic paint, or your spray bottles out, go to town. Same with stamps.

Give it some thought. Decide on a successful person you admire. (Doesn’t have to be an artist, either). Learn about them. Write down the habits you feel drawn to, make a detailed action plan, figure out how to do it. Put it into practice. Remember, just because it works one way for a person, doesn’t mean it will work for you. Customize it or leave it be. What’s the worst that can happen?