Posts Tagged ‘stencils’

bound by stars

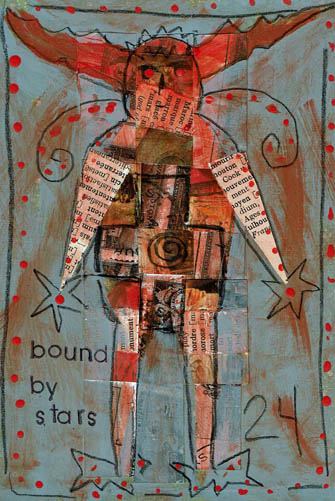
This Daily Art practice took the full hour to make. I barely had time to frame it out and add the acrylic dots and stamp the text.

Most of the time was spent weaving the paper strips. It takes awhile to get them situated and then affixed with matte medium, then dried enough to continue. I bought matte medium today because I ran out of it…I tried to get along with just Mod Podge but some applications don’t work with it. If I don’t want the hard resistant coating on the surface (like here to glaze it with acrylic) I prefer matte medium. If you aren’t aware, matte medium is a glazing medium, sealer and adhesive (lightweight). Mod Podge is a sealer and adhesive (heavyweight). If you want stuff impenetrable and permanent and affixed until the Four Horsemen ride through, Mod Podge is your huckleberry. Anything else use matte medium.

My plan with the piece was to mask the weaving in a shape of some sort.  A mask is a reverse of a stencil; in fact, a mask is the piece you get when you cut a stencil. Not all stencils create great masks, because if the stencil is very detailed you can’t keep all the bitty pieces to use as a mask. A stencil prints over where it is put and a mask prints around the space it is put. Obviously you don’t have to create a mask to do a mask technique…you can freehand letter or draw, around what you want to keep and cover what you don’t want with color.  In this way you can make an expressive drawing with shapes, letters and focal images in a composition. It is a fun way to do stuff, sort of in reverse.

I’ve seen artists put layers of material on a substrate only to cover up most of it with black paint. Seems like a bunch of work gone to waste to me, but the results are spectacular. Also, if you scan the piece before covering it, you can use the work over and over by printing it, thereby making use of the time it took to make it.

Keep in mind that you can use any color as your outline/fill, not just black. Also, depending on what you are outlining, you could use white or a pale color. That could be cool. I haven’t done that yet.

I was going to cut a stencil for this basic figure with the antlers. I would use it and it seemed worth the time to do it; I’d have both a mask and a stencil to use. However, the stencil board I have was under a bunch of heavy paper and I couldn’t get a sheet out. I looked around and saw a greeting card kraft bag (you know, the slender kind) so I cut the figure out with scissors. This was the easiest, fastest way to get the job done. Then, I laid the mask over the weaving and outlined with my favorite Wolff’s Carbon drawing pencil. I selected grey as a background cover because I like grey, but had I not been so hasty, I might have selected navy. It would have been richer with the orange and since I texted “bound by stars” navy would have made sense. Ahhh, another day.

If you are in a hurry or have hand problems or patience problems or are afraid/unable to use an exacto knife, a pre-cut stencil is an inexpensive long-lasting tool (although they are quite pricey for what they are, I mean cheap plastic). Since stencils have become so popular, they are now very detailed laser cut available in diverse design styles. I have stencils that I would not in a million years consider cutting out myself. But, you can make a perfectly wonderful unique stencil yourself in less than an hour. You can use your own drawings, clip art, images from photos, etc. You can scan a photo into a basic photo altering program, many of which feature a “stencil” filter. Print the altered photo and  create a stencil. If your program doesn’t have a “stencil” feature, up the contrast and voila, a usable image. Build a library of favorite symbols, animals, etc. You get the point. Anything that gets more of your own hand into a piece makes it more satisfactory and interesting, IMHO.

Don’t forget to keep the cut out parts of your stencils and put them in a separate envy called “masks”, or file them with the stencil.  Once you start to mask, you will be glad to have them.

Advertisement

ask for help

Another Daily Art practice piece with a vintage photo as a focal point. The reason I went to a photo again is because I am (again) rearranging and sorting materials and tools in my studio. In my Daily practice I’ve gotten to the point where I simply reach in and pull out something to use.

When I was sorting through shelves of old journals and books I could alter, I ran across some Canson Manga kits. I don’t know if they are still available. They are a beginner set for artists trying the comic book style. There are paper stencils to prepare layouts and one stencil is a “thought bubble” or narrative block. I liked them back in the day to create easy quick grids. They were buried in the journal shelves and I was glad to run across them. This week’s art seems to be a “Hey friend, so glad to see you!” week.

The photo is an odd size and in the portrait orientation. I put it up in the left hand corner and liked the way it went 3/4’s onto the page. But the bottom right was just filler and there wasn’t a lot of room to do any text, which isn’t necessary but the picture warranted something. So I cut the bottom right off and decided to grid it out. Gridding it seemed to help the story. Frame 1, guy on ledge watching Frame 2, guy trying to climb to ledge. Frame 3, rest the eye, Frame 4, narration. I had a piece of brittle aged brown drawing paper laying on top of the work island so I used the Canson stencil to cut out the window frame. The frame breaks up a bunch of non-narrative space and helps the viewer grasp the story. At least I hope so.

In recovery we learn to ask for help, and also learn to be willing to receive it, the way it comes. The guy that’s climbing isn’t asking for help and the guy on the ledge isn’t offering any. Maybe in the next second something happened, but right now I’m looking at what IS preserved and it seemed a good time to remind myself to Ask for Help. I don’t need help right now, but one day when I’m looking back on my Daily practice papers I might and this will remind me.

The wash is walnut ink, the rubber stamp text is StazOn Saddle Brown. The handwriting is Sepia Pitt Pen. As I did yesterday, I doodled a bit outside the photo to extend lines. I added some flowers because they got cut off by the frame.

In the second frame running down the center you might be able to see a stitch line. A few years ago I got froggy and took a bunch of old photos out and stitched them together on the sewing machine. I used them to make fabric/paper hanging collages and some were left over when I got bored doing that. Old photos can be very fragile. They were often glued to scrapbooks and then get taken out and the force of removing them weakens the paper. As I was gelling this photo to the foundation paper, the bottom tore off. No big deal, just wanted to mention that they can get very delicate.

Talk to you tomorrow, I reckon.

good dog

I’ve been eyeballing this vintage picture for a few weeks because it’s been on top of a stack of pictures that keeps falling over. Or the cats are knocking them over which is more likely. It was going into my Daily Art practice sooner or later so I made it sooner.

One thing you should know about me, and will most likely admire, is that I am a SUCKER for old photos. Any old photos. Half developed, half out of focus, any kind of half-assed, really. Good ones hardly interest me any more then mediocre or damn bad ones do. It’s perverse, but secretly you know you feel the same as me. I mean, have you ever seen one of those old black and white pictures where there is literally NOTHING but a horizon? Like, you know it’s happened to you, too. There was some kind of awesome cloud or an amazing bird formation and absolutely nothing shows on the shot. Back in the day, some old duffer sees 86 birds way up there, spelling the word Geritol or something (it is 1950, after all). He’s all excited and can barely get the manual focus right and snaps that award winner, thinking, “that’ll show ole’ Howard back home.” Then the roll gets developed and the disappointment settles in. Where are the Geritol birds? And his wife Milly screams, “Wilford, what were you THINKING??” And Wil wonders as well. Photography can be a cruel, cruel game.

There is hardly a homeless photo in Pinellas County. Well, there might be now but not in my heyday. Boxes, people. I have adopted countless ancestors, it’s a wonder that I don’t have a bunch of haints up in here. But I don’t, because the departed are happy to be wanted.

Actually, if I might wax philosophical here, and I might, because if a tree falls in the forest does it make a noise? It’s like that here on the blog almost always except for a few stalwart readers, long-time friends and relatives that trip over and think, what fresh hell today? Anyway, looking at unknown ancestors and doing your own ancestry history can bring up many emotional and intellectual issues. My sister sprang for Ancestry.com a couple years ago and we got into researching our family history like nobody’s business.  It was just interesting. I have a relative on my paternal grandmother’s side by the name of Napoleon Bonaparte. I am not kidding. What kind of parents name their kid Napoleon Bonaparte? Well, the kind that I am related to. It explains a lot.

As a photographer myself and as a curious person, I wonder what provoked them to shoot the picture. Or to shoot it the way they did. Like sometimes, when the husband puts the wife in front of the pink flowering dogwood. Which does he want to shoot? Is he a proud arborist or devoted husband? Can he be both? I suppose, but that isn’t as interesting. Everyone ASSUMES he is shooting the wife. After she dies, the grandbaby, dandling on PaPa’s knee, thumbing through the scrapbook. Kiddie, “Ooohh, pwitty!” Thought bubble over PaPa’s head, “Yes, it was a fine pink dogwood…” I mean, really.

Anyway, I can think and talk about this for a long time and I almost have today. I started with the picture. I set it on the paper foundation in the spot it is now. I almost never center anything on a page. I use the Rule of Thirds which I have discussed on this blog elsewhere. The dog is small in the photo, it was shot wonky and tilted. It is odd which is likely why I’ve been attached to it. All those different planes intersecting at obtuse angles. Hmm. One of my favorite art practices is to draw a continuation of something on a page. Like in this case, extending the photo out with drawing. Sometimes I do it with a pattern (like a floral), and extend it beyond the border. I like the “realism” plus the “handmarked imagined”. It’s a fun way to take something you didn’t do, and make it your own art. It’s more than just putting the picture on the page.

I used Neocolor watercolor crayons to draw out my added content. The bottom was empty, so I added a strip of old text. Then I took a piece of drywall tape and rubbed PanPastels over the surface. The tape is pretty deep so it tore up the foam applicator but it had been used and those things don’t last forever. I liked the scale of the squares so I continued the stenciling further than I planned at first.

It needed text and I wasn’t sure what to add. I considered a short quote about dogs but it didn’t interest me. There wasn’t a lot of room, either. I tried thinking about dog names from the 30’s but hell, I ain’t that old. Spike. Lad. Spot. Fido. If this dog was any of those, it was Lad but I can’t even. Lad. A Dog. Now you do know how old I am.

I decided not to name the dog. Nobody calls their dog by their name, anyway.  You know you don’t. Sometimes they are just Dog, or Puppy. Around here, the animals get called “Mr.” or “Missy” or “Oh No You Didn’t” or a word with “-ster” after it. Our dog is named Junebug, but we call her Bugster, June-ster, Junie Bloom, Junie, etc. My late cat, Raven, we called Ravy, Wavy Gravy, Ravy Gravy, Scamp, Crazy Cat, Termite and Shit Foot, but I’m not talking about that.

I put myself in the shooter’s place. If I was trying to leave the porch, or if I walked up to shoot the dog, I’d say “Stay!”. Then, if the dog stayed, which I assume this one did from the general lack of interest on his face, I’d say “Good Dog.”

If I’d had more time than an hour, I might have explored the situation from the dog’s side. I like how he’s looking off to the side, all casual. Mr. Hollywood. Get my good side. He might be saying to himself, “look at this dufus.” Maybe there was a squirrel over there that needed watching. If this was my dog, he’d have a cool name, but we’d just call him Bat Ears most of the time.


I fell in love with a scrapbook set of papers with a Japanese theme a couple of weeks ago. It had the usual back up accessories, like chipboard pop outs, stickers and alphabets. The little geisha and the bird were two of my favorite images from the set so I put them together. I was out in the garage and found this very stuffed but flat backed geisha doll and wondered if it is possible to go THAT 3-D in an art journal. Well, it is but with some caveats. First of all, your paper needs to be up to the task of holding the piece in place. This is my new go to Montval watercolor paper journal (90#) from Canson (the All Media I’ve already spoken of several times). The paper is pretty heavy, so that wasn’t a problem. Also, I set the found object geisha toward the spine, which would be my second suggestion: placement on the page. Third issue is that I forgot that this wasn’t a “stand alone” project like so many of mine are…soooooo, it is a tad tough to journal on the preceding half dozen pages. They are all lumpy. Because the top of the geisha is all stuffed and junk. So keep that in mind. One thing that would be SMART, so it never occurred to ME, would be to plan to have the stuffed geisha on the page but not actually PUT it on the page until you got any page effected by it finished, like the previously discussed preceding half dozen pages. Duh. Anyway, learn from my mistakes, grasshoppah. Don’t let the 3-Dness of an item immediately negate the idea of it in your art journal, but take my advice and do a little planning first. Think how it’s going to effect the rest of your work nearby. By the way, at the National Scrapbookers Day event I demo’d at this past Saturday, this page was popular. It definitely offers the unexpected as you flip through the book. p.s. Bamboo was stenciled with Dylusions ink. Awesome.

A simple grid over a two page spread became the foundation for these calendar journal pages. The upper left box contains a Crafter’s Workshop stencil image sprayed with Dylusions spray ink. I love dandelions and couldn’t wait to use this stencil. I hope you can at least see some of the watercolor effect the Dylusions spray ink had, and I love the intermixability of these inks. As you can see not each square of the grid has journaling. I used scrapbook paper scraps and turned the dandelion stencil wet side down after spraying the main image to get color on the right bottom center and right near bottom square. I do not like wasting ink!! Because the stencils are plastic the overspray stays wet a long time and it can be monoprinted onto any other page or project you have going. I put an opened up cardboard slide holder on the bottom right square and stamped “April” on the bottom right with what I believe is a 7 Gypsies journal rubber stamp set. I liked prepping and using this spread so much that it is now the second class in my Art Journal series beginning in a couple of weeks at Whim So Doodle in St. Pete. Prepping is easy. Draw the grid, watercolor into each square by mixing your colors and making each square a different color, spray some with ink, use a stencil that you like that goes along with the month you are working on. Or draw or doodle into squares to make it even more personal. Pick a square to stamp your month into, use a box style to write the date in each square that will be for journal writing. Put something cool in the remaining squares for visual interest. Then every day all you have to do is show up with a pen and write a few sentences into the appropriate square. Easy peasey.

I really love this small portion of graffiti I shot more than a year ago on the side of a building where artists were allowed to paint. It was a montage of several artists but I enjoy the composition of this picture and took tight shots of pieces rather than the whole wall. There is such an elegance in the line and the grey, white, black and red color scheme, and I like the stenciled dollar signs in contrast to the sweeping sprayed lines of paint. Unfortunately, the wall is now blank and I was glad I documented the art while I had the chance. This blurred line art reminds me of the capability that the Stabilo All pencil has for making a watercolor-like line with graphite. In other words, this look could be replicated in our journals with a bit of practice. Cool to think about.

Perhaps these should be called Shadow Lites rather than shadowlets. Caused by sun randomly striking my kitchen countertop in the afternoon while some mehndi stencils were out for use. After the first one I set some up, some stencils worked better than others. I like how there is actually a shadow of the shadow working in this one in some spots. I’ve spoken about shadow play before and I urge you again to watch for opportunities to capture random patterns that occur anytime the sun is in the correct position and angle. Just the other day I captured Count Dracula on the paper supply in my printer. The sun came through and shadowed the paper holder in such a way as it looked like a vampire with a cape. I’ll show you that one if it came out, at a later date.

Nonesuch Moon is an expressive painting using a paper plate for a template, worked on a stretched canvas. Like some of my expressive paintings, it exists no more as the desire to paint portraits of women with moustaches took over and this canvas got repurposed. In order to preserve the lineage of work I do like to take pictures of finished work, even if (or especially if) I think it may only have a short life span. I like this painting and will very likely use this image in my journal at some point if I ever again get a color printer that works. In this way, paintings that no longer exist, whether the canvas was repurposed or the image was sold, can live on for the artist in current work. Be sure to document all your work with either photos or scans, if the work is small enough. Shoot the work at least 300 dpi so that you could have a greeting card or print made, and do a separate image at 72 dpi for the web display. I always keep the original photo in case either “saved” copy (your altered copies) get destroyed. Another idea for photo use of artwork is having a book made. Not as expensive as you might think and great fun to have. Comes in handy when visiting a new gallery or going out on an art date with friends to keep them updated on your progress. Happy painting and happy shooting!

The design for this pretty picture was not mine but Dina Wakley’s, whose class I took on Saturday. In three hours I made this painting and another on stretched canvas. Dina is a good teacher and we used very good supplies which made the project even more enjoyable. This image is on watercolor paper, gesso’d, birds were traced, then overdrawn with Stabilo ALL water soluble pencil (which I LOVE–new go-to tool), painted, stenciled and journaled on. I don’t take very many classes, this was my first art class in many years. Definitely worth the time and funds. Check to see if Dina might be coming to a venue near you.

Another in my Mehndi Hand series, this one done a bit differently. First I stenciled the hand in purple Claudine Hellmuth Studio Paint, then when that dried, I re-stenciled with Golden Light Modeling Paste, using the stencil a smidge off register. This allowed the previous purple image to show instead of covering it up. Then I rubber stamped on the message and used the Sew Stamper tool to put in the crazy quilt inspired zig zag stitch line. Lumiere paint in green provides the background around the hand and I may have used a Distress dauber in chartreuse over top of the modeling paste. On 6″x8″ canvas board, the first background is paper.