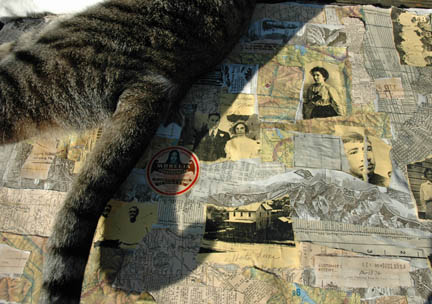
I will apologize first off for the blown out image. I hate shooting in the sun but today there was no alternative. Also, the cat would not move and he weighs about 45#.
Fabric paper offers a lot of opportunities, and I have exploited them often and with great enjoyment. Any fabric will work and I have variously used vintage linen and new fabric. Keep in mind you can cover the fabric up as much as you want with the paper. If you use a print or solid that you want to show, leave gaps between and/or around the images.
After you decide on your fabric the next step is to decide on your images. I find that working with too-thick images doesn’t work, i.e. postcards. They are too thick and too inflexible, but go ahead and experiment if you want to use them. They would be cool but I find the thickness frustrating.
Let’s also say this now: My intention at this stage is not to make a masterpiece. This is the foundation of my ultimate use for the fabric. My mode is to look for texture now, or interest in a background sort of way. Later it will be embellished with whatever you decide, thread, more detailed images, sewing, beads.
I use Mod Podge™. I’ve said this before on this blog. It is an inexpensive alternative medium, thick, with good body when dry and it does the job. I pour the Podge™ out on the fabric, squeegee it around with a credit card and quickly apply the papers. It’s a good idea not to work with too much real estate at one time. Podge™ dries fast, but don’t worry, put on more if you need to.
Concentrate primarily on getting the papers stuck in place. There isn’t a need to go over them with Podge™, but if you get some on top, just swipe it with the credit card. The reason you don’t want a bunch of Podge™ on the top is because it will make your Fabric Paper more sealed and plastic-y. If you want it this way, go for it. But any ink, paint or dye you want to put on later is not going to get absorbed well. Actually thinking now about it, if you want a streak or texture you can exploit the “resist” aspect by deliberately creating marks with Podge™ that the liquid color won’t cover. That would be fun.
Get all your paper glued down. If there are ends or edges that aren’t glued well, get some Podge™ on there and smooth them down, especially if you are not going to sew at all. Sewing helps get everything put down that you might leave unglued. I like to have some edges not stuck but this could bother you. If you are going to sew on top and you aren’t sure, do some looser to see later how it works for you. Remember, it’s just fabric and stuff you’ve got around the place giving you allergies.
There will be wrinkle-age. Deal with it! Some of them will flatten as they dry but some of them won’t. That’s the way the cornbread crumbles.
The humidity, thickness of fabric, amount of Podge™ you used and the phase of the moon will determine how long it will take to dry. It has to dry through all the layers, so don’t push it. Better safe than sorry. You do NOT want to run damp Podge™ fabric through your sewing machine. I can’t EVEN tell you what that mess would be. Learn patience.
After your fabric is dry, decide if you want a unifier besides sewing. By unifier, I mean a layer of paint, ink or dye. I am currently experimenting with walnut ink that I make from crystals. I love this stuff (you can find it and other wonderful things at animadesigns) and get a real kick out of throwing everything in there to see if it will work. (See another example here). More about those experiments at a later time. For now, I made a strong brew, about 1/2 tsp in a salsa container. I ate the salsa first. I used a large paintbrush to apply the ink. It beads up on any spot that has heavy Podge™. It will also puddle in low spots and I like this. I try to get a coat on every part and especially between the images and around the edges of the fabric. After Coat 1 is dry, apply Coat 2, really getting into any areas you want darker. I want it unified, but not all the same tone.
Now, if you use acrylic paint instead as your unifer, work in a small area, paint over top of the images and wipe down quickly. Use the same heavy/light application technique, but layer and go slow. It’s easier to add more, impossible to get rid of unless you sand and there goes your paper. With acrylic paint you can also add an acrylic medium to make more of a glaze and longer working time, that’s more like inking. Remember, acrylic is plastic. It’s a permanent coat.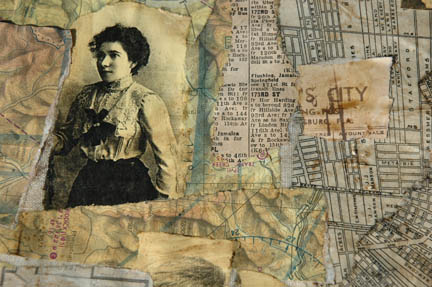
Walnut ink is a subtle dye. Also, it is a purplish brown dye, keep that in mind. It looks murky in the container and when it goes on, but it dries light. I trust you can see in this picture how the papers seem more one tone, how the muslin is toned, and a few paper edges are really dark.
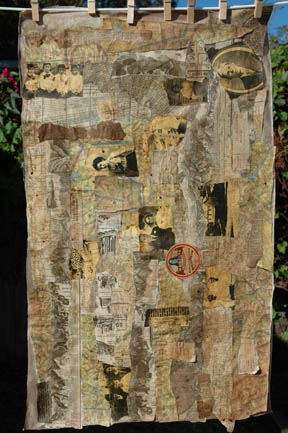
I decided that I wanted two coats for now. It got hung on the washing line to dry. In the Florida sun it was probably dry by the time I got the last clothespin on, but I wanted to write this up so it’s still out there.
It’s coming along nicely. In Part 2 I’ll tell you what I’m using it for and we’ll see what I decide to do before I sew it on the machine. I know you are busting with anticipation. Get a grip on yourself!
Great things happen when listening to Jane Siberry’s “When I Was a Boy”.
